Inspecting Fuel Injectors and Cups
Inspecting Fuel Injectors and Cups
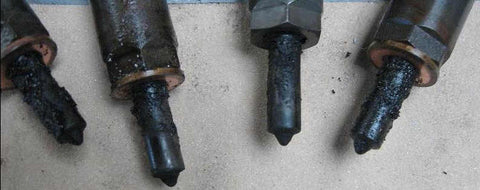
An injector showing blow back as seen in Fig 1 is a problem. Inspect the injector sleeve for any wear. If wear is present replace.
Fuel Contamination
If your injectors show any staining, pitting, or discoloration it is recommended that you flush your fuel system. Refer to Fig 2.
Injector Removal and Install
Use hand tools only. Powered tools are not advised. Use a T40 Torx Bit for Early Models and at T45 Torx Bit for Late models to remove the injector hold downs. Remove any fluids from the injector sleeve and the bolt holes for the hold down bolts. Clean the sleeve and verify that the previous copper washer was removed. Proper torque must be applied to ensure a successful install. Early Models should be torqued to (24 lb ft) and late models (26 lb ft). Lubricate the injector with clean diesel engine oil.
An injector showing blow back as seen in Fig 1 is a problem. Inspect the injector sleeve for any wear. If wear is present replace.
Fuel Contamination
If your injectors show any staining, pitting, or discoloration it is recommended that you flush your fuel system. Refer to Fig 2.

Injector Removal and Install
Use hand tools only. Powered tools are not advised. Use a T40 Torx Bit for Early Models and at T45 Torx Bit for Late models to remove the injector hold downs. Remove any fluids from the injector sleeve and the bolt holes for the hold down bolts. Clean the sleeve and verify that the previous copper washer was removed. Proper torque must be applied to ensure a successful install. Early Models should be torqued to (24 lb ft) and late models (26 lb ft). Lubricate the injector with clean diesel engine oil.

Fuel Rail Installation
Inspect the fuel rail balls tubes for any burs or noticeable wear. Fuel Rails with worn ball tubes should be repaired or replaced. Verify that the ball tubes are aligned before installing injectors. Improper alignment will result in early damage to the injector orings.
***Apply lubricate, diesel engine oil, to the ball tubes before install. Fill the top of the injector with clean diesel oil before installing fuel rail***
Final Steps
Service vehicle oil and oil filters before restarting the engine. We also recommend servicing the fuel filters after an Injector Install. Allow adequate time for engine to purge air before operating.
Service vehicle oil and oil filters before restarting the engine. We also recommend servicing the fuel filters after an Injector Install. Allow adequate time for engine to purge air before operating.